
4 Steps to Loading Semi-Structured Data in Snowflake with Informatica Cloud Mass Ingestion
Last Published: Aug 15, 2022 |
With the growing volume and complexity of data, semi-structured data is more common than ever. Semi-structured data is information that is not arranged according to a pre-set data model or schema. It can include a wealth of information, making it more complex to manage efficiently. Semi-structured data cannot be stored in a traditional relational database. It includes logs, xml files and data in different file formats such as json, Avro and Parquet.
A lack of fixed, rigid schema makes semi-structured data storage challenging. Interpreting the relationship between data from multiple data sources in separate silos makes it hard to efficiently ingest, process and analyze data.
With all this complexity, how can you simplify the management of semi-structured data at scale?
In this blog post, you will see how to efficiently ingest and process data into Snowflake using Informatica’s end-to-end Intelligent Data Management Cloud (IDMC) services. IDMC is cloud-native, AI-powered, metadata-driven. IDMC lets you quickly ingest large volumes of data from a variety of sources. These sources include databases, applications, streaming and files onto cloud or on-premises repositories or onto messaging hubs for real-time analytics. This helps with data processing and reporting.
Informatica Cloud Mass Ingestion, the data ingestion and replication service in IDMC, lets you ingest data into Snowflake without requiring any coding.
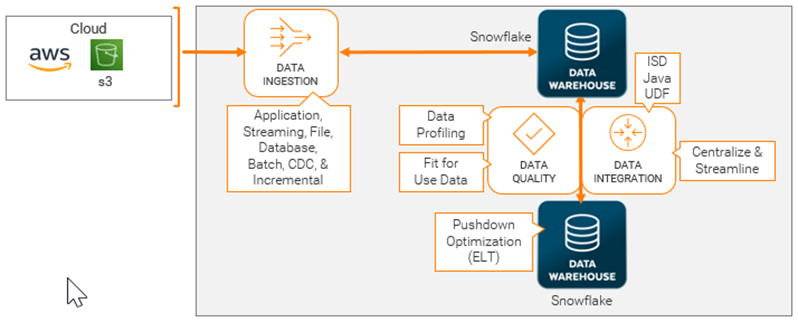
Here’s a high-level use case architecture diagram. It shows how to move data from a cloud data lake to a cloud data warehouse. We will focus on IDMC’s data ingestion service:
4 Steps to Loading Semi-Structured Data in Snowflake
Some key benefits of using CMI for loading your semi-structured data in Snowflake include:
- Speed: Build data ingestion jobs in minutes with a simple 4-step wizard-based experience
- Simplicity: Simplify data ingestion with a single, unified cloud-native data ingestion solution with out-of-the-box connectivity
- Scale: Ingest terabytes of any data, any pattern, at any latency. You can do this at scale in real-time and batch with no data limit
- Flexibility: Track, capture, and update changed data in real-time with automatic schema drift support. This accelerates database replication and synchronization use cases
Cloud Mass Ingestion is categorized into four different ingestion tasks. These are application ingestion, database ingestion, file ingestion and streaming ingestion. This blog post covers only the file mass ingestion task.
Now let’s see how to ingest data from Amazon Web Services (AWS) S3 to Snowflake using a file ingestion task. Informatica Cloud Mass Ingestion allows you to do this with a simple, no-code four-step wizard:
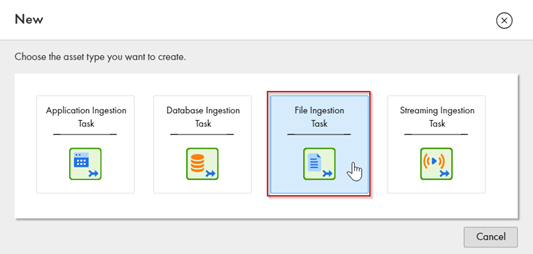
Step 1: Create a new File Ingestion Task
In this step, we will select the asset/task type that we want to create for ingesting data.
- Select the “File Ingestion Task” option
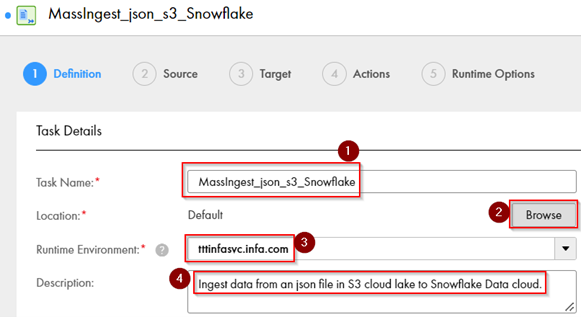
Step 2: On “Definition” tab, set up properties
In this step, we will define the properties of the File Ingestion task.
- Task Name – Mention the task name
- Task Location – Select the location where the Task needs to be stored using Browse option.
- Runtime Environment – Select from the drop-down menu
- Add Description (optional)
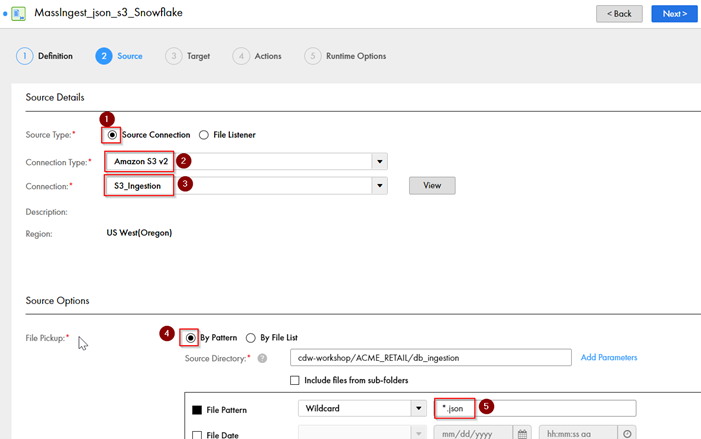
Step 3: On “Source” tab, set up connection details
In this step, we will set up the source connection details and properties for the task:
- Source Type – Select “Source Connection” as the type of connection.
- Connection Type – From the different connection categories that Informatica provides, select the appropriate source connection type we are going to use for this task, in this case “AWS S3.”
- Connection Name – Select the name of the connection from the dropdown.
- File Pickup -- Select “By Pattern” as the option to select files that match a specific pattern.
- Pattern: “*.json” – Then select all files from the S3 connection with json as the file extension.
The rest of the settings can be left “as is.”
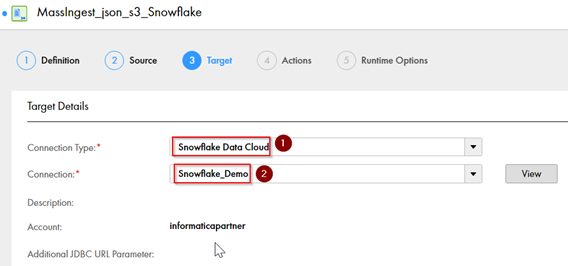
Step 4: On “Target” tab, set up target information:
Target Details:
- Connection Type – Select Snowflake connection type from the drop-down menu
- Connection Name – Select the target connection name from the drop-down menu
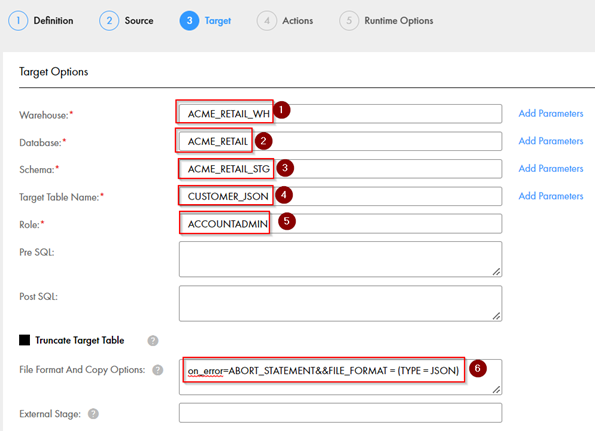
Target Options:
- Warehouse – Add the warehouse name for the Snowflake
- Database – Add the Database name for the Snowflake
- Schema – Add the schema name for Snowflake
- Target Table Name – Add the target table of the asset in Snowflake
- Role – Add the role of the Snowflake account
- File Format and Copy Options – To load data to target in the same json format
That’s it! Your configuration to load semi-structured data in Snowflake is all set!
Running Your Configuration
Next, if you want to want to compress, decompress, encrypt, decrypt, perform a virus scan on a file or carry out any other action, you can do that under the “Actions” tab.

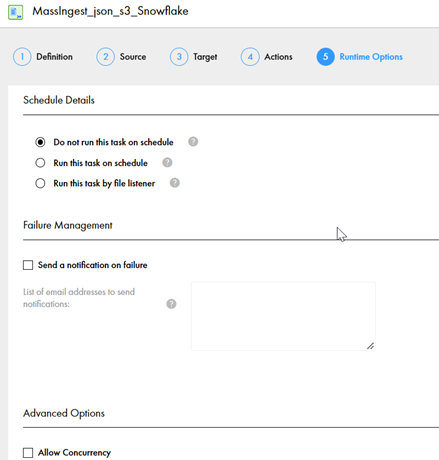
Under the “Runtime Options” tab, you can choose from these options:
- Schedule the job
- Add a notification feature and run the job in concurrency to improve the performance
For now, we will continue with default options. We will simply “Save” the mass ingestion configuration task.
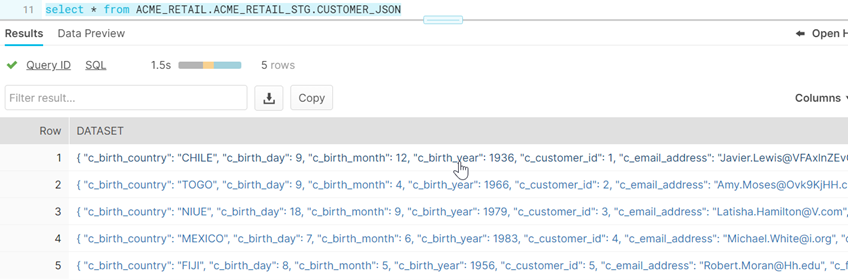
Now let’s run the file ingestion job. We can see the successful execution of the file ingestion task loading data into Snowflake in the json format.
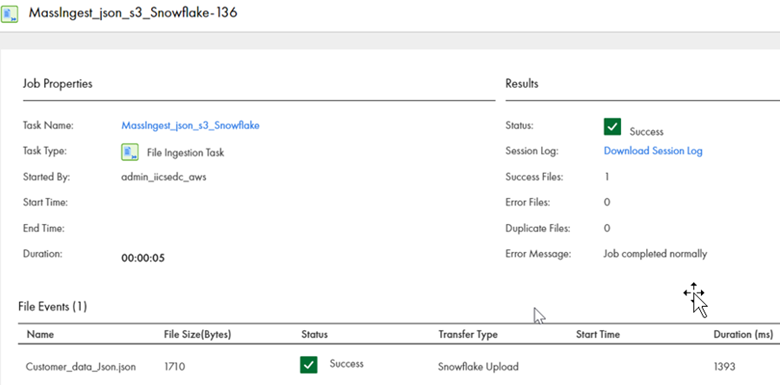
When we query on the Snowflake table, we can see how the json data has been ingested successfully into Snowflake in the same format without any manual coding.
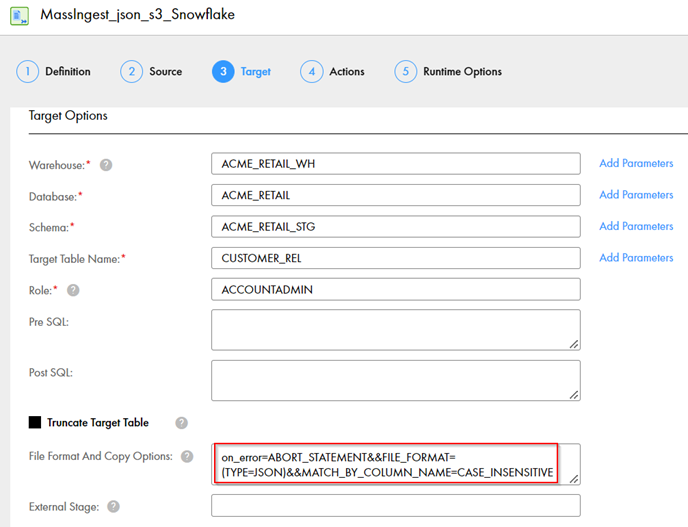
We additionally have the option to load the json data to Snowflake in the relational format. We would do this using the same file ingestion task modifying the file format and copy options in the “Target” tab without any manual coding.
Under Step 4, On “Target” tab, set up:
- Warehouse – Add the warehouse name for the Snowflake
- Database – Add the database name for the Snowflake
- Schema – Add the schema name for Snowflake
- Target Table Name – Add the target table of the asset in snowflake
- Role – Add the role of the Snowflake account
- File Format and Copy Options – To load data to target in relational format by matching the column names between json file and target asset in Snowflake
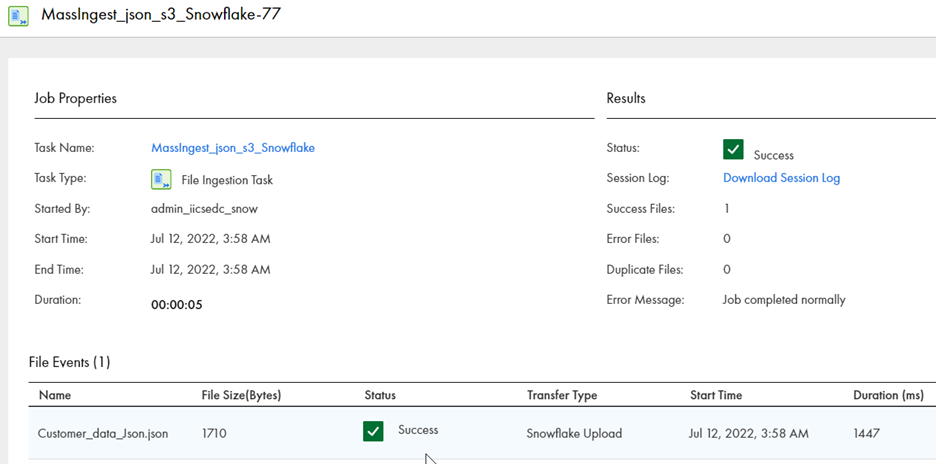
Once we save and run the mass ingestion task, the file ingestion task successfully loads data into Snowflake in relational format.
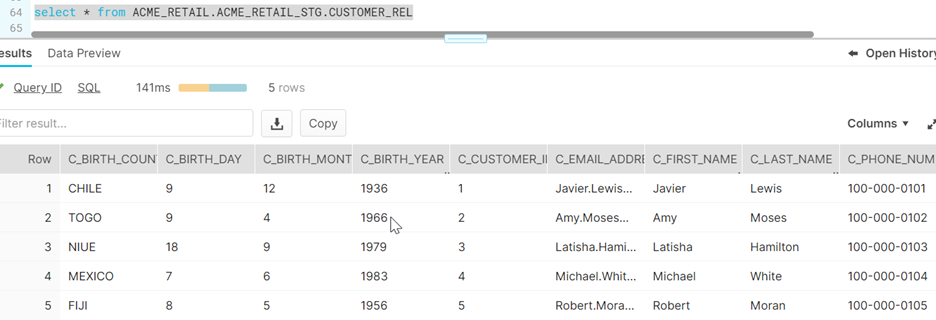
When we query on the Snowflake “Target” table, we can see how the json data has been ingested successfully into Snowflake in relational format based on the match between column names without any manual coding.
Next Steps
Now that you can see how easy it is to load your semi-structured data in Snowflake with Informatica Cloud Mass Ingestion, you can try it yourself for free. You can also learn more about Cloud Mass Ingestion or explore the reference architecture. Follow this documentation to sign up for the free trial via Snowflake Partner Connect.
Here are some additional links to get started with end-to-end intelligent data management cloud services from Informatica:
- Informatica Intelligent Data Management Cloud overview
- Cloud Data Quality
- Cloud Data Integration
- Cloud Data Governance