
Seamlessly Connect Informatica to Oracle Database@AWS, Database@Azure and Database@Google Cloud
Last Published: Oct 06, 2025 |
Table Of Contents
Table Of Contents
Introduction
Packed with features and built-in AI capabilities, Oracle Autonomous Database (ADB) is a powerful, self-driving, and self-securing database service. When combined with the industry-leading data management capabilities of Informatica Intelligent Data Management Cloud (IDMC), the result is a robust solution for your modern data warehouse and analytics needs.
But if you’re running Oracle ADB on a different cloud, such as Google Cloud, Microsoft Azure, or AWS, there’s no need to worry. Connecting Informatica to Oracle ADB is straightforward, regardless of your cloud provider.
This guide will walk you through the step-by-step process to configure an Informatica IDMC connection to an Oracle Autonomous Database instance hosted on AWS (Oracle Database@AWS), Azure (Oracle Database@Azure), and Google Cloud (Oracle Database@Google Cloud).
Prerequisites
Before we begin, make sure you have the following ready:
- Informatica IDMC Org: Access to your Informatica Intelligent Data Management Cloud organization.
- Secure Agent: A running and configured Informatica Secure Agent. This agent must have network connectivity to your Oracle ADB instance.
- Oracle ADB Instance: An active Oracle Autonomous Database instance in one of the hyperscalers.
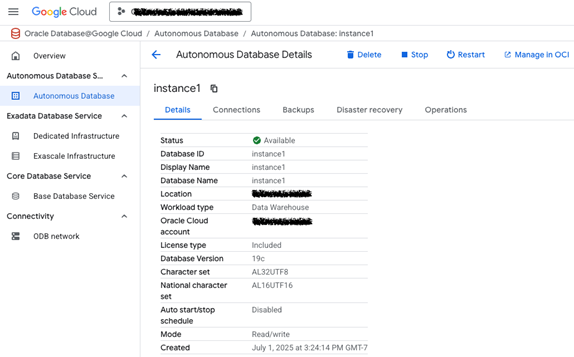
Image: Example of Oracle Database@Google Cloud.
- Oracle Client Wallet: You will need to download the client credentials wallet (wallet.zip) from your Oracle ADB instance. This wallet contains the necessary certificates, keys, and network configuration files to establish a secure connection.
Configuration Steps:
The fundamental process for setting up the connection is the same, no matter which cloud provider hosts your Oracle ADB. The main differences lie in the networking setup, covered in the next section.
Step 1: Download the Oracle Wallet
The first and most crucial step is to get the connection wallet.
- Navigate to your Oracle Autonomous Database instance details page in the Oracle Cloud Infrastructure (OCI) console.
- Click on DB Connection.
- Under Download client credentials (Wallets), select the wallet type (Instance Wallet is recommended for most use cases) and click Download Wallet.
- Provide a password to encrypt the wallet's keys. Remember this password! You'll need it in sStep 4 below.
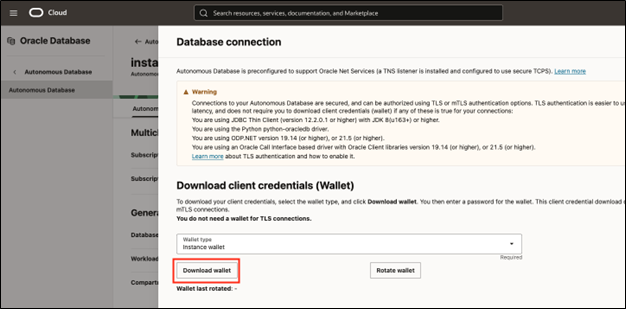
Image: Where to download the wallet in the OCI console.
Step 2: Prepare the Wallet Files on the Secure Agent Machine
- Transfer the downloaded wallet.zip file to the machine where your Informatica Secure Agent is installed.
- Unzip the file into a secure, permanent directory. For example:
- Linux: /opt/informatica/wallets/adb_wallet/
- Note down this directory path. You will need it soon.
Step 3: Configure the sqlnet.ora File
Inside your unzipped wallet directory, you will find a file named sqlnet.ora. This file tells the Oracle client where to find the wallet.
- Open the sqlnet.ora file in a text editor.
- Verify that the WALLET_LOCATION parameter points to the correct directory. It should look like this:
WALLET_LOCATION = (SOURCE = (METHOD = FILE) (METHOD_DATA = (DIRECTORY=”?/network/admin”)))
The ? is a placeholder that defaults to the Oracle home directory. For clarity and to avoid issues, it's best to replace it with the full path to your wallet directory.
Example for Linux:
WALLET_LOCATION = (SOURCE = (METHOD = FILE) (METHOD_DATA = (DIRECTORY=”/opt/informatica/wallets/adb_wallet”)))
Step 4: Create the Connection in Informatica IDMC
Now, let's head over to the Informatica IDMC Administrator Service to create our new connection.
- Log in to your IDMC org and navigate to the Administrator service.
- Click on Connections in the left-hand navigation pane.
- Click New Connection.
- Fill in the connection details:
- Connection Name: A descriptive name, e.g., Oracle_ADB_CRM_DW.
- Type: Select Oracle from the dropdown list.
- Runtime Environment: Choose the Secure Agent where you placed the wallet files.
- Authentication Mode: Select Oracle Database Authentication from the dropdown list.
- Username: The database username.
- Password: The password for the database user.
- Host: The hostname for the database.
- Port: The port number of the database.
- Service Name: This is the most important part. Open the tnsnames.ora file from your wallet directory. You will see several entries like mydatabase_high, mydatabase_medium, etc. Copy one of these service names and paste it here. For example: mydatabase_high.
- Encryption Method: Select SSL Auto from the dropdown list.
- Crypto Protocol Version: Select TLSv1.2 from the dropdown list.
- Trust Store: Enter the directory path to the cwallet.sso file.
- Trust Store Password: Enter the password from Step 1 Download the Oracle Wallet above.
- Host Name in Certificate: Enter the hostname for the database.
- Key Store: Enter the directory path to the keystore.jks file.
- Key Store Password: Enter the password from Step 1 Download the Oracle Wallet above.
- Key Password: Enter the password from Step 1 Download the Oracle Wallet above.
Your final configuration should look something like this:
- Click Test Connection. If all the steps and networking are correctly configured, you should see a message saying, "The test for this connection was successful".
- Click Save.
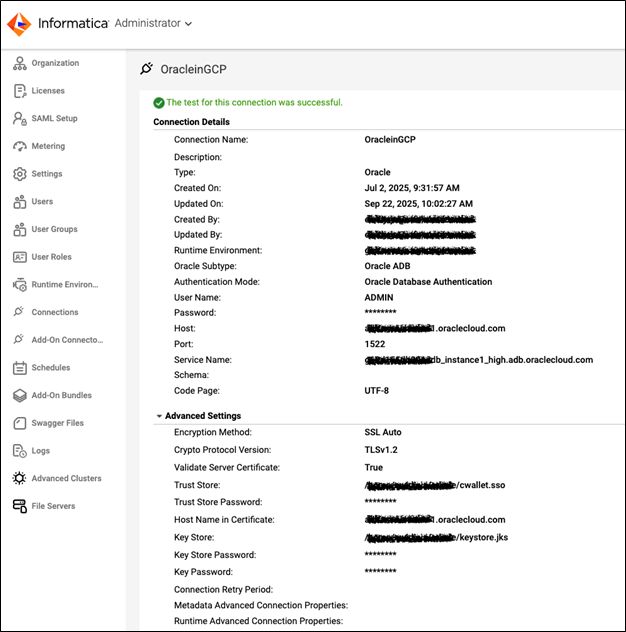
Image: Oracle connection setup in IDMC.
Troubleshooting Common Issues
- ORA-12504: TNS:listener was not given the SERVICE_NAME: Double-check that the "Connection String" in your Informatica connection setup exactly matches a service name from your tnsnames.ora file.
- ORA-12529: TNS:connect request rejected based on current filtering rules: This is a network ACL issue. The IP address of your Secure Agent is not whitelisted in the Oracle ADB's network access rules..
- ORA-28759: failure to open file: The path to the wallet in your sqlnet.ora file is incorrect, or the Secure Agent user doesn't have read permissions for the wallet directory and its files.
Conclusion
Connecting Informatica IDMC to an Oracle Autonomous Database is a powerful way to supercharge your data integration and analytics pipelines. With Oracle’s commitment to customer multicloud success and by correctly configuring the Oracle Wallet, you get the flexibility and control to seamlessly integrate data, regardless of which cloud your services reside on.
To learn more, visit here.