
Creating Secure Connections with Informatica’s Snowflake Data Cloud Connector
Last Published: May 20, 2026 |
Table Of Contents
Spring 2026 IDMC Release
Deliver the trusted context your agentic AI demands with Informatica and Salesforce.
As the data landscape evolves, securing access to critical cloud data platforms such as Snowflake is paramount. From Informatica, the Snowflake Data Cloud Connector seamlessly integrates with Snowflake, offering advanced authentication methods to connect to Snowflake and ensure your data pipelines run securely and smoothly.
The simplest way to connect to an external system is through username and password. However, simple does not mean safe, and the standard authentication framework has its own pitfalls as it directly manages credentials. This poses a security risk to such an extent that most security standards recommend multi-factor authentication to ensure that systems are safe and secure.
In this blog, we explore the different authentication methods available via the Informatica Snowflake Data Cloud Connector and how they empower organizations to implement secure, flexible and scalable connections to Snowflake.
Overview of the Informatica’s Advanced Authentication Methods
The Informatica Snowflake Data Cloud Connector supports three advanced authentication methods:
- OAuth 2.0
- Key-Pair Authentication
- Programmatic Access Token
OAuth 2.0
Open authorization provides secure, delegated access without requiring Informatica to store or manage the user's Snowflake password. Informatica supports two OAuth flows:
- Authorization Code: The user is redirected to an external identity provider (Okta, Microsoft Entra ID, or Snowflake's own OAuth) to grant consent. The client (Informatica) then exchanges the received code for an access token and optionally a refresh token.
- Client Credentials: This flow is often used for service-to-service communication where no human user is involved. Informatica presents a Client ID and Client Secret to the authorization server to directly obtain an access token tied to a Snowflake service user or role.
The authentication method is ideal for user-centric connections requiring Single Sign-On (SSO) or for securely granting limited access to a specific role without exposing credentials. It is the preferred method for interactive connections and for large enterprises utilizing an Identity Provider (IdP).
Key-Pair Authentication
This is a highly secure, non-interactive method that replaces password use with a pair of cryptographic keys. The process involves:
- An RSA public/private key pair is generated.
- The Public Key is uploaded and assigned to the dedicated Informatica user in Snowflake.
- The Private Key (often encrypted with a passphrase) is stored securely on the Informatica Secure Agent machine.
During connection, Informatica uses the private key to sign a JSON Web Token (JWT), which is presented to Snowflake, which then verifies the signature using the stored public key, granting access without a password ever being transmitted.
The authentication method is the industry-standard approach for automated, machine-to-machine, or service account connections.
Programmatic Access Token
PAT is a simple, revocable, token-based credential that acts as a secure replacement for passwords.
- A long-lived token can be generated directly in Snowflake and used in place of the password in connection strings or as a Bearer token in API headers.
- PAT provides additional security as it’s tied to a specific role and subject to account-level security policies
- The platform can only accessed through the IP addresses whitelisted as part of account level network policy in Snowflake.
Recommended for applications that don't natively support Key-Pair or OAuth flows. It provides easy-to-manage, flexible credentials for both service and human users.
Walkthrough Guide: Snowflake OAuth Authorization Code with Snowflake Data Cloud Connector
To enable OAuth access, the Snowflake Administrator first establishes a Security Integration, which acts as the secure gateway. When a user connects from Cloud Data Integration, they are redirected to the Snowflake authorization server to log in and approve access with a specific role. Upon approval, Snowflake returns an authorization code, which the application exchanges for a secure, role-based access token. This token then creates a secure session, allowing the application to run data integration tasks securely.
Prerequisites:
- Snowflake user with permissions to create storage integrations, and security integrations in Snowflake.
- Access to Account Admin role to create the required OAuth security objects in Snowflake.
Process:
Prepare the Snowflake environment by logging into the Snowflake portal with your ACCOUNTADMIN role, then collect the relevant details:
- Your Snowflake account name found in the Snowflake URL.
- User role and warehouse name (available on the Worksheets tab).
- Database and schema to be accessed by the connection.

Create OAuth Security Integration in Snowflake:
Run the SQL command below (example parameters shown for reference) to create a Security Integration object in Snowflake that enables OAuth authentication.
Command:
CREATE SECURITY INTEGRATION <Integration name>
TYPE = OAUTH
ENABLED = TRUE
OAUTH_CLIENT = CUSTOM
OAUTH_CLIENT_TYPE = 'CONFIDENTIAL'
OAUTH_REDIRECT_URI = 'https://<your-informatica-instance>/ma/proxy/oauthcallback'
OAUTH_ISSUE_REFRESH_TOKENS = TRUE
PRE_AUTHORIZED_ROLES_LIST = (‘<relevant role 1>’, ‘<relevant role 1>’)
This integration acts as a secure gateway allowing Informatica to authenticate via OAuth.
Retrieve OAuth Integration Details
- Run command to view integration details
Use DESC SECURITY INTEGRATION <Integration name>
- Copy the Authorization URL and Access Token URL, typically under parameters named OAUTH_AUTHORIZATION_ENDPOINT and OAUTH_TOKEN_ENDPOINT.
- Run command to retrieve the Client ID and Client Secret
SELECT SYSTEM$SHOW_OAUTH_CLIENT_SECRETS(‘<Integration name>’). - Keep all these values securely for use in the next steps.
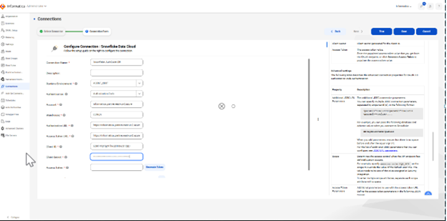
Create a Snowflake Data Cloud Connection in Informatica
- Log into Informatica Intelligent Cloud Services.
- Navigate to Administrator > Connections.
- Create a new connection selecting Snowflake Data Cloud as the connection type.
- Name the connection and choose the runtime environment.
- For Authentication, select Authorization Code.
- Enter your Snowflake account, warehouse, and user role.
- Input OAuth details you retrieved earlier:
- Authorization URL
- Access Token URL
- Client ID
- Client Secret
- Scope (if required)
- Click to generate the access token.
- An interactive login prompt will appear to authenticate your Snowflake user and authorize access.
- Verify and Save Connection
- Upon successful authentication, you’ll see the access token generated and a success confirmation.
- Test the connection to ensure connectivity and proper authorization.
Walkthrough Guide: Okta Client Credentials Authentication with IDMC Administrator
This method enables server-to-server authentication without user interaction. Your Snowflake application authenticates directly with Okta, obtaining an access token used to securely access Snowflake resources.
Prerequisites:
- An active Okta Developer account with permissions to create applications and authorization servers.
- Access to Informatica IDMC Administrator with appropriate privileges to create connections.
- Snowflake account credentials with ACCOUNTADMIN role to create security integrations.
Steps involved:
- Create an Okta Account and Log In
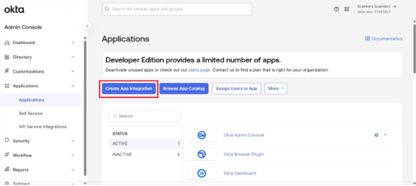
- In the Okta Developer Console register your Snowflake Application
- Navigate to the Applications page and create a new app integration.
- Select OpenID Connect as the sign-in method and Web Application as the application type.
- Name the app (e.g., "Snowflake Web App1").
- In the grant type settings, enable Client Credentials and Refresh Token.
- Enter your Informatica IDMC instance URL in the Redirect URI fields to ensure secure token callbacks.
- Configure controlled access by allowing all users or restricting groups as per your policy. Avoid enabling immediate access with Federation Broker mode.
- Save the app integration and note down the Client ID and Client Secret securely.
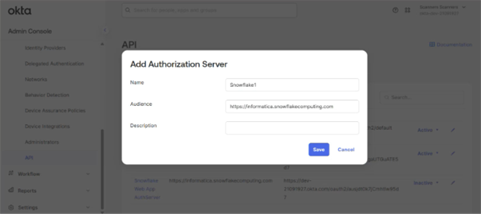
- Create an Authorization Server in Okta
- Go to the API tab and add a new Authorization Server.
- Name the server clearly (e.g., "Snowflake Auth Server").
- Set your Snowflake account URL as the Audience, ensuring tokens are issued specifically for your Snowflake environment.
- Save the server.
- Add scopes to define permissions, using a naming convention like session:role:<warehouse_name>, and set user consent and default scope settings.
- Configure access policies and rules, creating policies assigned to your Snowflake application, specifying the Client Credentials grant type and disabling Device Authorization grants.
- Save all configurations.
- Copy and keep handy the Issuer URI, Metadata URI, Token Endpoint, and JWKS URI for later use.
- Create a Security Integration in Snowflake
- Log into Snowflake as ACCOUNTADMIN.
- Using the Snowflake worksheet, run commands to create a security integration with OAuth type set to 'Okta'.
- Specify the Okta Issuer URI, JWKS URI, and your Snowflake account URL as the audience.
- Complete the integration setup and verify success.
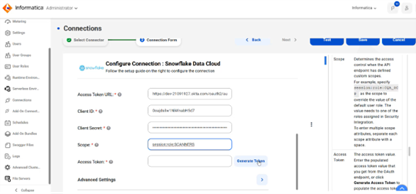
- Configure the Snowflake Data Cloud Connection in Informatica IDMC
- Log into your Informatica Intelligent Data Management Cloud Administrator.
- Navigate to the Connections page and create a new Snowflake Data Cloud connection.
- Name your connection and select the appropriate runtime environment.
- Choose Client Credentials as the authentication method.
- Enter your Snowflake account and warehouse names.
- Input the Okta-provided token endpoint as the access token URL, along with the Client ID, Client Secret, and corresponding scope value.
- Generate the token to verify authentication success.
- Test the connection to ensure validity and save your configuration.
Conclusion
The modern authentication methods eliminate the risks associated with password management, enabling secure, token-based access that aligns with industry best practices and compliance requirements. Whether you are setting up user-consent-driven connections with OAuth Authorization Code or automating server-to-server workflows with Okta Client Credentials, Informatica’s integration ensures data pipelines operate smoothly and securely.
By following the step-by-step guides, you empower your teams to establish secure, scalable, and seamless connections between Informatica and Snowflake, protecting your data assets while enabling efficient cloud data management across your enterprise. For enterprises aiming to future-proof their data integration strategies, adopting these advanced authentication methods is not only a best practice but a necessity in safeguarding critical business data.
Connect with an expert today to learn more.